Avery Depot

Avery Depot
It took very long to build, but now it is nearly ready - the depot!

Samstag, 18. Juni 2011

The Farewell Session

As I'm writing this post the last session of St Paul Pass I itself is history. Only 7 attendants (one of them late) appeared and that made it a very relaxed (some say too relaxed) session. The last time there were fewer than 8 participants was in December 2008! Due to the fact that only 2 through trains each way were running it was not too compelling for the dispatcher as there was a gap of 12 fast hours between them.
However, it is known that for a good session we need at least 10 people.

Since there will be a longer pause until the next session and for the first few sessions a large crowd won't be needed, this is not really a problem anymore.

Here are a few pics my son Florian and I made during the session:

This is the last track cleaning train at the beginning of the session.  I use the CR and 2 SP units that don't see use in many trains. Here CR 6338 will soon be splitting the signals at Kyle West switch.


A little while later we see it somewhere between Kyle and Adair
 and finally approaching Avery....

This small sawmill is a masterpiece from my son Florian (that was before he found out that there are girls out there...) It will be saved and get a fine place on the new layout.

The 936/937 job to Ethelton is seen here (at least the tail end) - in the background we have the gas tube ...oh my... it's in the way of level 3. I forgot it completely when planning the St Paul Pass II! Fortunately, the track will fit under it. It's not beautiful, but there is no way removing it...

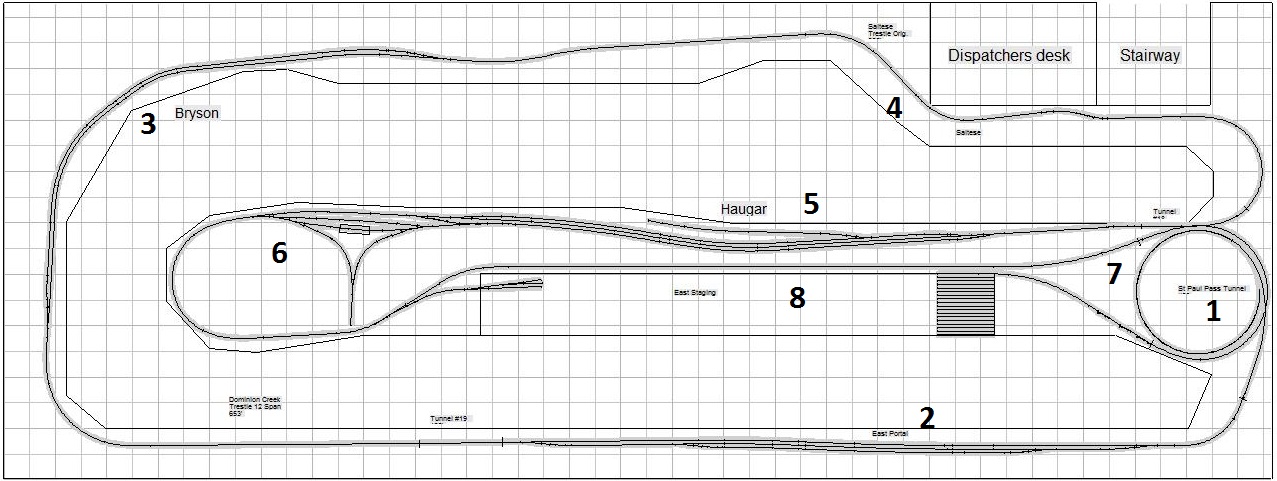
East Portal West switch is on the upper level and Hobo Ridge on the lower one. The name comes from the hobo camp at it's base.
 Adair and the cement mill.

Marmoraton Mining Limestone Works will be saved, too. It already has a place on my plan (level 1).

Marble Creek will not be a junction any more. This is the last #925 moving out of the tunnel. On the left are the first two towers of Kelly Creek trestle which will also find a home on the new layout. The white spot on the right is the hole I battered out of the gypsum mountain to find two missing locos. (Long story)

The other half of Kelly Creek trestle. I thought it was a good idea to separate the levels with a 2-turn helix. As it turned out this was not the case. 45 cm ( 17") radius combined with a more than 3% grade is taxing all locos to the extreme. Sometimes even 4 6axle SD40-2 are not enough. This is a part of StPP I that would have been changing anyway.

Here is a detail shot of the lumber cabin, made by my son Florian (before, you know...), complete with interior, for example a stove, beds and drawer.
 This is Mr. Lumberjack himself, sitting on his bed. In the background there is his nice lamp.

The last through train.....

Little Joe #22 waits for an assignment.

The area of the roundhouse with a few helpers waiting for trains that won't be coming any more....

The ready track with an NW2, SD40 and U23B

The wrecking track. The wrecking train will be moved to St Maries (where it belongs).

Wolfgang as an eager-to-learn Yardmaster has done a very good job to keep the yard clean...

SD40-2 #157 (with long hood forward!) arrives at Avery. The helper is uncoupled (just now - as you can see the 0-5-0 in the back) and will soon find an empty track at the roundhouse.

#932 in Calder. Seems that stealth NW fans are among us as we have a long hood again!

The next signal shows red-over-red, which is quite correct....

Mr Hobo and his friend are chatting. They sure hope that Sherrif Smith won't be coming along..
Yes, the Milwaukee even has modern concrete ties laid down....
 The US Forest Service loading track.
 The overpass at Calder which leads to the USFS track.

Yellow over red at East Portal
..the end of the line for now.

Freitag, 10. Juni 2011

St Paul Pass II - Level 3

After exiting St Paul Pass tunnel, we are at an inconvienient height - that's why there will be steps located on the floor for the convenience of the operators.

Now, we are on the east side of the pass and have reached Montana at (1) when we leave the helix representing St Paul Pass.
At (2) we have East Portal siding and head straight for Bryson (3). Maybe, I should try to put more curves in this stretch?
The track between Bryson and Saltese (4) whith the low trestle should also be located nearer to the edge of the benchwork.
We pass through a last tunnel (it's here because it passes over the staging runaround track!) and arrive at Haugan, Montana (5) with the wye and the shed for the snow plow. (6)
There is no way to model the NP connection in any way, but I can live with that. And the wye is on the wrong side of the track, but again - I can live with that, too.
The track makes one last horseshoe curve and heads into East Staging (not drawn with all 18 tracks). To gain room for the second entrance the runaround track (7) runs over the line between Saltese and Haugan, but parallel to the helix coning from level 2. It crosses under the approach track of the helix at (1)

That's it - we have done a journey from Plummer Junction, Idaho to Haugan, Montana on the St Paul Pass II.

I'll have to plan how to make the central part (the long tongue) and think about how to make the duckunders but other than that it's pretty much straightforward.

Dismantling of StPP I will start after our video session in July when we'll have documented StPP I in all it's glory. The layout served me well for over 15 years. The kids have grown and start to leave home, I got older and wider, have a very good (and demanding) job, so let's do it.

Start of construction is scheduled for early 2012, I'll just make the new dispatcher's cabin and the relocation of the electrical components in 2011 to give me more time for re-thinking....

St Paul Pass II - Level 2

..and we continue our journey eastward through the valley of the St Joe river when our train emerges from the helix at (1) and continues to Kyle siding (2).

Between Kyle and the next siding at Falcon (4) there are 5 tunnels and 4 trestles. I'll have to lower the ground here to give the trestles some height.
Falcon is the place where our huge cement plant (5) is located - on the StPP I it was at Adair.It's now in the foreground and easily reachable, although it interferes with Avery west yard below, but that is one of the compromises that are necessary.

And it's here where I have to cheat a bit. In order to be able to pass under the cement plant the mainline is actually dropping a few centimeters here, while the long spur to the plant rises 1.7% in order to gain altitude.
The line continues on to Adair siding (6) which will only have a short log loading spur, again located near the edge to make it easier to access.

Behind Adair the loop follows - unfortunately it should be located west of Adair siding - but again....

The follows Kelly Creek trestle, whose footings will be located on the level below. If you take a look at the drawing of level 1 you might notice that the track is somewhat awkwardly curved between (4) and (5). That's because the trestle towers need space! And I won't repeat the mistake of StPP I, a tower footing exactly over the lower track.

And then it goes up to Roland siding (7) and into St Paul Pass tunnel (8), which is not open any more but represented by the third helix.

Dienstag, 7. Juni 2011

St Paul Pass II - Level 1

Level 1 is the upper St Joe River valley between St Joe and Stetson sidings.


We start at (1) where we leave the helix between levels 0 and 1.

(2) is Zane siding which we leave behind for Calder (4). In between there is a long tunnel at (3).
One of the lessons learned from StPP I is that an active track between an active yard and the fascia is not a good idea.

In Calder (4) was a small sawmill which will be modelled here.

(5) is Herrick spur for the loading of logs.

(6) is Pocono siding and (7) Ethelton siding, where another switching puzzle waits. It is here where Marmoraton Mining will be located. To make it somewhat easier a short runaround track will be located here.

And (8) is Avery West yard, with turntable and service tracks. I tried to locate it further away from Avery East yard (9) to make it a challenge for the yardmaster and have a startup job for guests, as they all will start as hostler here.

Following the track to (10) the grade up the pass starts and Stetson siding is higher than neighbouring Calder siding at (4).

Then follows Stetson viaduct which leads into the second helix uo to level 2.

St Paul Pass II - Level 0

Here is Level 0 - it depicts basically the broad St Joe River valley between Plummer Junction and St.Joe.

We start where we left Level 0, at (1). Here the track becomes visible and Code 55.

At (2) we reach the east switch of Plummer Junction yard. In reality, there was a small yard there.

At (3) is the focus of the action - it's where the Spokane line rejoins and the Union Pacific Wallace branch diverges. The turnout arrangement is nearly that of the 1970ies.

Plummer Junction is (was) a switching puzzle as follows: First the Metaline Falls job arrives via the Spokane line and backs it's train into Plummer yard and then splits it up between east- and westbound cars. Second, the UP turn from Wallace arrives and leaves the cars to be interchanged for the locos from the Metaline Falls job on the Spokane line.
Third, the St Maries-Plummer local arrives with cars bound for Spokane and Metaline Falls, which are taken over by the engines of the Metaline Falls Job.
Fourth, the Metaline Falls Job leaves.
Fifth, the UP turn to Wallace arrives and gets cars from the Plummer turn and leaves.
Sixth, road trains take & set out Spokane cars.
Seven, the Plummer-St Maries turn leaves for St Maries.

Operators demanded switching puzzles - here it is!

(4) is Pedee siding
(5) is Lake Benewah trestle - almost as long as it is in reality. It is such a beauty that I have to include it!
(6) is Silvertip Landing - at last a real destination for the log cars! It was here where logs were dumped into Lake Benewah.
(7) is St Maries.It had a lot of local industries (found them in an old shippers guide, but also in TMR. (The Milwaukee Roader - the magazine of the MRHA) So again, this will keep any yardmaster busy. This will be the homebase of the big hook (crane) and a small car repair shop.
Leaving St Maries brings us to (8), the wye of the Clarkia branch, today abandoned but very much alive here. One shortcoming is that it is on the wrong side of the track and the curve on the branch is very small. So this will be 4-axle engines and short cars country - which is correct anyway.
(9) is where the Regulus mill spur diverges (also on the wrong side of the tracks, but I digress) and a combination truss & girder bridge is located.
(10) is Omega siding
(11) is St Joe siding

and (12) is what I intended to never use again - a helix. The truth is - I cannot do without.
I will be using 60 cm (approx. 2ft) radius at a minimum and keep the grade at 1.4% plus it will be accessible easily.
 It's location forces me to use longer tunnels that were not really there, but cometimes you gotta compromise...
There are no spurs or industries on this level except in St Maries whose yardmaster has a corner all for himself.

St Paul Pass II - Level -1

The fun starts here - the lowest level will be at a height of 70cm (or slightly more than 2 ft). That's pretty low, but it's a storage level only. I hope I can use one rolling armchair at this height.

(1) is West Staging yard, complete with 18 tracks - just the same that it is now, except that it will get a second ladder. Today, it is one-ended only and that has proven to be a major headache. It costs precious time to rearrange the trains and it is not good for the locos to be handled every time.

(2) is a new storage yard for unit trains and unused cars, I hope that I can re-use Peco track from the old layout.


Between (1) and (3) is a long but straight ramp up to Level 0, which it reaches at (5), at which point the tracks will be 20 cm higher than before.

At (3) are the west switches of Plummer Junction, still hidden.

At (4) the Spokane-Marengo line splits from No.3 track and finds it's way to Level 0 separated from Plummer yard. This represents, as the name implies, the passenger line via Spokane and will only be used by passenger trains and the Metaline Falls Job and the Union Pacific's Wallace trains. All this - and the 2 yard tracks just visible near (5) will make Plummer Junction an interesting spot on the layout.

At (5) we've reached 90cm (approx. 3ft)  from the ground and the visible part of the layout.

I've changed a lot of my premisses of St Paul Pass I (StPP I):
First, the long hidden track I was to avoid at all cost on StPP I - I might be hiding a WebCam in there to help the engineers. What I've learned is: it is only important that hidden track is easily reachable, it's length is not important. I could have used a helix here but that would have gained me nothing.

Second, the orientation of the tracks: East is always to the right when facing the layout. There is no running against the direction and seeing the same scene twice, but from different directions.
Sprachenen>de GoogleDicKE
direction, quarter